Background——背景
在这篇文中,我们会看看Live7和Live8的控制脚本之间有哪些不同,透过Max for Live的control surfaces来仔细观察最新的APC40(和APC20)的脚本——并展示一些在APC脚本上的hack。如果你是初次认识MIDI remote scripts,你或许要看看part1关于框架类的介绍,再来阅读part2。Keeping up with the recent changes——跟上最新的变化
如先前讨论的,我们对于MIDI控制脚本的编写大多是基于反编译Python pyc文件。Live7的脚本用的是Python2.2,并已被证明是相对容易被反编译的。Live8集成了Python2.5,另一方面,这也意味着新的挑战。现时仍未有可靠的,可以容易使用的方法来反编译python2.5文件。然而,利用现有的工具和方法去好好地找出MIDI remote script最新变化是可能的。Unpyc就是这样的一种工具,而且Unpyc可以反编译python2.5文件——但只是有限的程度。在大多淑情况下,它只会生成部分的源代码,但至少它让我们知道在哪里遇到了问题。但是,它在反汇编2.5文件时没有错误。当我们可以对部分代码反编译,和对全部代码反汇编的时候,就有可能去重建可运行的脚本源代码——尽管这个过程大部分时间都很枯燥。但是即使没有完整的重建源代码,Unpyc运行我们让我们一探脚本幕后的运作和弄清楚最新的MIDI remote scripts有了哪些变化。
例如,以下是在Live8.1.1版本中APC40.py脚本中的mixer设置方法:
- def _setup_mixer_control(self):
- is_momentary = True
- mixer = SpecialMixerComponent(8)
- mixer.name = 'Mixer'
- mixer.master_strip().name = 'Master_Channel_Strip'
- mixer.selected_strip().name = 'Selected_Channel_Strip'
- for track in range(8):
- strip = mixer.channel_strip(track)
- strip.name = 'Channel_Strip_' + str(track)
- volume_control = SliderElement(MIDI_CC_TYPE, track, 7)
- arm_button = ButtonElement(is_momentary, MIDI_NOTE_TYPE, track, 48)
- solo_button = ButtonElement(is_momentary, MIDI_NOTE_TYPE, track, 49)
- mute_button = ButtonElement(is_momentary, MIDI_NOTE_TYPE, track, 50)
- select_button = ButtonElement(is_momentary, MIDI_NOTE_TYPE, track, 51)
- volume_control.name = str(track) + '_Volume_Control'
- arm_button.name = str(track) + '_Arm_Button'
- solo_button.name = str(track) + '_Solo_Button'
- mute_button.name = str(track) + '_Mute_Button'
- select_button.name = str(track) + '_Select_Button'
- strip.set_volume_control(volume_control)
- strip.set_arm_button(arm_button)
- strip.set_solo_button(solo_button)
- strip.set_mute_button(mute_button)
- strip.set_select_button(select_button)
- strip.set_shift_button(self._shift_button)
- strip.set_invert_mute_feedback(True)
- crossfader = SliderElement(MIDI_CC_TYPE, 0, 15)
- master_volume_control = SliderElement(MIDI_CC_TYPE, 0, 14)
- master_select_button = ButtonElement(is_momentary, MIDI_NOTE_TYPE, 0, 80)
- prehear_control = EncoderElement(MIDI_CC_TYPE, 0, 47, Live.MidiMap.MapMode.relative_two_compliment)
- crossfader.name = 'Crossfader'
- master_volume_control.name = 'Master_Volume_Control'
- master_select_button.name = 'Master_Select_Button'
- prehear_control.name = 'Prehear_Volume_Control'
- mixer.set_crossfader_control(crossfader)
- mixer.set_prehear_volume_control(prehear_control)
- mixer.master_strip().set_volume_control(master_volume_control)
- mixer.master_strip().set_select_button(master_select_button)
- return mixer
将7.0.18中等价的代码与上面进行对比:
- def _setup_mixer_control(self):
- is_momentary = True
- mixer = MixerComponent(8)
- for track in range(8):
- strip = mixer.channel_strip(track)
- strip.set_volume_control(SliderElement(MIDI_CC_TYPE, track, 7))
- strip.set_arm_button(ButtonElement(is_momentary, MIDI_NOTE_TYPE, track, 48))
- strip.set_solo_button(ButtonElement(is_momentary, MIDI_NOTE_TYPE, track, 49))
- strip.set_mute_button(ButtonElement(is_momentary, MIDI_NOTE_TYPE, track, 50))
- strip.set_select_button(ButtonElement(is_momentary, MIDI_NOTE_TYPE, track, 51))
- strip.set_shift_button(self._shift_button)
- strip.set_invert_mute_feedback(True)
- mixer.set_crossfader_control(SliderElement(MIDI_CC_TYPE, 0, 15))
- mixer.set_prehear_volume_control(EncoderElement(MIDI_CC_TYPE, 0, 47, Live.MidiMap.MapMode.relative_two_compliment))
- mixer.master_strip().set_volume_control(SliderElement(MIDI_CC_TYPE, 0, 14))
- mixer.master_strip().set_select_button(ButtonElement(is_momentary, MIDI_NOTE_TYPE, 0, 80))
- return mixer
如我们看到的,Live7.0.18和Live8.1.1的代码中的主要区别,主要是name attributes被赋值到大部分的components和elements。所以什么需要names?就是Max for live。
Max for Live - keeping up with Cycling'74 —— 跟上Cycling‘74 Max for Live的脚步
Max for Live需要Live8.1或以上版本,因此,新的Live8版本包含了Max兼容的MIDI remote scripts。name attribute(name属性)赋值给python对象和方法允许Max for Live可以更容易看到并读取python方法和对象(对象包含control surfaces,components和control elements)。这可以在Max for Live的LiveAPI资源补丁中得到验证(M4l.api.SelectComponent,M4L.api.SelectControlSurfaces,M4L.api.SelectControl等等)。在我们进行说明之前,先来看看Max里Live Object Model(LOM)中的Control Surfaces.
Live Object Model中有三个根对象——live_app(Application),Live_set(Song)和control_surface(Control Surface)。Cycling’74提供了前两个对象的详细文档,而第三个似乎落下了——毫无疑问是故意的。基于LOM的图表,我们可以看出Control Surfaces根对象包含了components和control类。这直接对应了python框架模块(例如ControlSurface,TransportComponent,SessionComponent等模块)。如今,虽然该文件中关于它们的解释是不存在的,事实证明python框架对象和方法对Max for Live是可见并且是可用的。脚本方法对于Max而言是函数(function)——可以通过在Python脚本中定义的语法和参数进行调用的函数。
显而易见,为了对如何操作复杂的Control Surfaces有一个正确的认识,对与python脚本的研究是关键——因为那是Control Surface function的起源。我们会说明Max for Live和python脚本之间的联系,但在这之前,让我们来揭开非常流行的Live控制器——APC40——下的秘密。
The APC 40 - under the hood —— 公开APC40下的秘密
最新的Live7版本包括了APC40的MIDI remote script,当然Live8.1或更高版本也支持APC40。如之前提高的,Live8.1中的APC40的脚本有些轻微的差别——总的来说,name属性被赋值到大多数的方法和对象。我们将在这里立足于研究8.1.1的脚本,努力地去看看有什么事情发生了。
在APC40的脚本目录下,有11个文件:
- __init__.pyc
- APC40.pyc
- DetailViewControllerComponent.pyc
- EncoderMixerModeSelectorComponent.pyc
- PedaledSessionComponent.pyc
- ShiftableDeviceComponent.pyc
- ShiftableTranslatorComponent.pyc
- ShiftableTransportComponent.pyc
- SpecialChannelStripComponent.pyc
- SpecialMixerComponent.pyc
- RingedEncoderElement.pyc
__init__.pyc脚本没有什么有趣的地方,正如大多数的脚本:
- import Live
- from APC40 import APC40
- def create_instance(c_instance):
- """ Creates and returns the APC40 script """
- return APC40(c_instance)
这是一个标准的初始化脚本,正如part1中对于脚本的介绍。现在,有着稍长命名的脚本文件是一些特殊类,继承自
框架模块,但添加了定制的功能。这些类的作用(和他们继承自框架类的命名)在各自的脚本中的注释中说明了:
- class DetailViewControllerComponent(ControlSurfaceComponent):
- ' Component that can toggle the device chain- and clip view of the selected track '
- class EncoderMixerModeSelectorComponent(ModeSelectorComponent):
- ' Class that reassigns encoders on the AxiomPro to different mixer functions '
- class PedaledSessionComponent(SessionComponent):
- ' Special SessionComponent with a button (pedal) to fire the selected clip slot '
- class RingedEncoderElement(EncoderElement):
- ' Class representing a continuous control on the controller enclosed with an LED ring '
- class ShiftableDeviceComponent(DeviceComponent):
- ' DeviceComponent that only uses bank buttons if a shift button is pressed '
- class ShiftableTranslatorComponent(ChannelTranslationSelector):
- ' Class that translates the channel of some buttons as long as a shift button is held '
- class ShiftableTransportComponent(TransportComponent):
- ' TransportComponent that only uses certain buttons if a shift button is pressed '
有趣地,注意到EncoderMixerModeSelecrorComponent模块在AxiomPro脚本中已经被回收了。
而目前最有趣的地方,是APC40.py——大多数的改动都在这里。这个文件开头是加载其他模块:
- import Live
- from _Framework.ControlSurface import ControlSurface
- from _Framework.InputControlElement import *
- from _Framework.SliderElement import SliderElement
- from _Framework.ButtonElement import ButtonElement
- from _Framework.EncoderElement import EncoderElement
- from _Framework.ButtonMatrixElement import ButtonMatrixElement
- from _Framework.MixerComponent import MixerComponent
- from _Framework.ClipSlotComponent import ClipSlotComponent
- from _Framework.ChannelStripComponent import ChannelStripComponent
- from _Framework.SceneComponent import SceneComponent
- from _Framework.SessionZoomingComponent import SessionZoomingComponent
- from _Framework.ChannelTranslationSelector import ChannelTranslationSelector
- from EncoderMixerModeSelectorComponent import EncoderMixerModeSelectorComponent
- from RingedEncoderElement import RingedEncoderElement
- from DetailViewControllerComponent import DetailViewControllerComponent
- from ShiftableDeviceComponent import ShiftableDeviceComponent
- from ShiftableTransportComponent import ShiftableTransportComponent
- from ShiftableTranslatorComponent import ShiftableTranslatorComponent
- from PedaledSessionComponent import PedaledSessionComponent
- from SpecialMixerComponent import SpecialMixerComponent
正如预期,除了Live的加载(可直接调用LIve API),和之前列出的一些特殊的模块,其余加载的都是_Framework模块。再一次,你可以看看part1来明白更多细节。
下面的是一些常量,用于APC40的sysex通讯(sysex——系统专用):
- SYSEX_INQUIRY = (240, 126, 0, 6, 1, 247)
- MANUFACTURER_ID = 71
- PRODUCT_MODEL_ID = 115
- APPLICTION_ID = 65
- CONFIGURATION_ID = 1
然后,在命名和注释语句后面,我们有强制__init__方法。APC40的__init__方法如下:
- def __init__(self, c_instance):
- ControlSurface.__init__(self, c_instance)
- self.set_suppress_rebuild_requests(True)
- self._suppress_session_highlight = True
- is_momentary = True
- self._shift_button = ButtonElement(is_momentary, MIDI_NOTE_TYPE, 0, 98)
- self._shift_button.name = 'Shift_Button'
- self._suggested_input_port = 'Akai APC40'
- self._suggested_output_port = 'Akai APC40'
- session = self._setup_session_control()
- mixer = self._setup_mixer_control()
- self._setup_device_and_transport_control()
- self._setup_global_control(mixer)
- session.set_mixer(mixer)
- for component in self.components:
- component.set_enabled(False)
- self.set_suppress_rebuild_requests(False)
- self._device_id = 0
- self._common_channel = 0
- self._dongle_challenge = (Live.Application.get_random_int(0, 2000000), Live.Application.get_random_int(2000001, 4000000))
如我们看到的,基于框架的标准脚本是用与创建session对象,mixer,devic和transport组建,和全局控制(global controls),然后将mixer赋值给session。这里没什么玄秘的地方——除了_dongle_challenge.你可能会想——那个臭名昭著的”秘密握手(secret handshake)“在哪里?没错,在handle_sysex。
The Secret Handshake - not so secret anymore——秘密握手,不再秘密
在APC40登上零售货架时,我们发现secret handshake是基于系统专用信号通信(sysex exchange)。但它是如何运作,又是藏在哪里?这不是隐瞒哪些不能用基本框架脚本能完成的(如part1所叙述的),它通过发送”加密信号(dongle chanllenge)“的系统专用信号,并等待控制器有一个正确的响应。如果控制的响应符合预期(即,握手成功),控制器上的所有控制都会可用并且显示高亮的session框(即红色框)。以下是handle_sysex方法的部分代码,原生的python:
- def handle_sysex(self, midi_bytes):
- if ((midi_bytes[3] == 6) and (midi_bytes[4] == 2)):
- assert (midi_bytes[5] == MANUFACTURER_ID)
- assert (midi_bytes[6] == PRODUCT_MODEL_ID)
- version_bytes = midi_bytes[9:13]
- self._device_id = midi_bytes[13]
- self._send_midi((240,
- MANUFACTURER_ID,
- self._device_id,
- PRODUCT_MODEL_ID,
- 96,
- 0,
- 4,
- APPLICTION_ID,
- self.application().get_major_version(),
- self.application().get_minor_version(),
- self.application().get_bugfix_version(),
- 247))
- challenge1 = [0,0,0,0,0,0,0,0]
- challenge2 = [0,0,0,0,0,0,0,0]
- #...
- dongle_message = ((((240,
- MANUFACTURER_ID,
- self._device_id,
- PRODUCT_MODEL_ID,
- 80,
- 0,
- 16) + tuple(challenge1)) + tuple(challenge2)) + (247))
- self._send_midi(dongle_message)
- message = ((('APC40: Got response from controller, version ' + str(((version_bytes[0] << 4) + version_bytes[1]))) + '.') +str(((version_bytes[2] << 4) + version_bytes[3])))
- self.log_message(message)
- elif (midi_bytes[4] == 81):
- assert (midi_bytes[1] == MANUFACTURER_ID)
- assert (midi_bytes[2] == self._device_id)
- assert (midi_bytes[3] == PRODUCT_MODEL_ID)
- assert (midi_bytes[5] == 0)
- assert (midi_bytes[6] == 16)
- response = [long(0),
- long(0)]
- #...
- expected_response = Live.Application.encrypt_challenge(self._dongle_challenge[0], self._dongle_challenge[1])
- if ((long(expected_response[0]) == response[0]) and (long(expected_response[1]) == response[1])):
- self._suppress_session_highlight = False
- for component in self.components:
- component.set_enabled(True)
- self._on_selected_track_changed()
上面关于系统专用信号符合了Akai APC40 Communications Protocol document中的说明。好的,标准的MMC设备查询和响应部分是没有问题的——加密的部分并没有公开。如我们看到的,其中的一些信号交换参与了设置APC40进入“Ableton模式”和确定apc的宿主应用为Live——包括主要,次要和bug修复版本信息。
虽然APC40的握手过程对于妨碍设备的仿真是很有效的,然而我们并不清楚它在这里是为了保护什么,因为任何脚本都可以使用框架中的SessionComponent模块(或这LiveAPI)来得到红框的使用和显示。另一方面,谁会想仿真一个有8*5方格LED按键,16个旋钮,一个硬接线,一个交叉推子,和9个滑块的不可编程的MIDI控制器——除非是哪些已经拥有了APC40的用户?我怀疑大多数的Monome用户都不会对将他们的高大上硬件去仿真一个如APC40这样的主流市场产品,再说,他们已经有一大堆开源的软件应用和脚本了。所以真正奇怪的地方是:为什么要加密?
在任何情况下,绕过握手过程简直是最简单的破解handle_sysex的方法。除了在模式初始化过程中,sysex在APC40的脚本中并不重要。
现在,来改变以下节奏,让我们看看如何利用脚本来控制APC40’s的LED。我们用python代码来设置一个小小的灯光演示,并在Max中调用它。
APC40 Lights & Magic
正如APC40通信协议文档中所说明的,APC40里大量的LED(据Akai说的有380个——因此需要一个单独的电源)可以通过发送MIDI信号来操作。这里没有系统专用信号——只需要简单的note on和note off命令。
发送MIDI note-on信号可以点亮LED。在信号的第一个字节是note-on的部分,包含了用于指明轨道号(对于那些与轨道相关联的LED)的MIDI通道信号位。单独的LED在第二个字节中被标识(note number),然后第三个字节用于设置颜色和LED的状态。APC 40 note map是一个有用的参考。
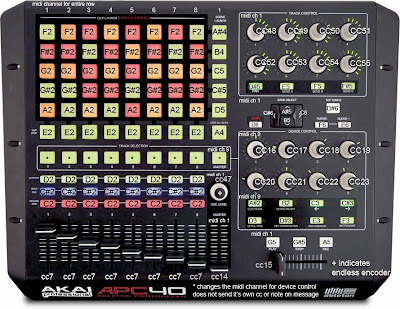
通信协议文档中列出了clip launch中的LED可以显示的颜色和状态:
0=off, 1=green, 2=green blink, 3=red, 4=red blink, 5=yellow, 6=yellow blink, 7-127=green
在APC40的python脚本里的_setup_session_control方法中,这是被分配的值:
- clip_slot.set_started_value(1)
- clip_slot.set_triggered_to_play_value(2)
- clip_slot.set_recording_value(3)
- clip_slot.set_triggered_to_record_value(4)
- clip_slot.set_stopped_value(5)
python脚本中的数值跟通信协议文档中列出的颜色和状态符合,尽管只有五个赋值语句。假如我们想改变8*5网格的颜色赋值(例如对于有色觉缺陷的人),我们需要对脚本的这一部分进行重写。
现在,基于这些信息,我们可以设立一个颜色的随机模式——利用LiveAPI来生成随机数,然后得到颜色并向下滚动矩阵的行。
这是为我们的脚本写的__init__.py:
- from APC40plus1 import APC40plus1
- def create_instance(c_instance):
- return APC40plus1(c_instance)
这是我们需要写的脚本:
- # http://remotescripts.blogspot.com
- from APC40.APC40 import *
- class APC40plus1(APC40):
- __module__ = __name__
- __doc__ = ' Main class derived from APC40 '
- def __init__(self, c_instance):
- APC40.__init__(self, c_instance)
- self.show_message("APC40plus1 script loaded")
- self.light_loop()
- def light_loop(self):
- #self.name = 'light_loop'
- for index in range (4, 105, 4): #start lights in 4 ticks; end after 104; step in 4 tick increments
- self.schedule_message(index, self.lights_on) #turn lights on
- for index in range (108, 157, 4): #start turning off after 108 ticks; end after 156; step in 4 tick increments
- self.schedule_message(index, self.lights_off) #turn lights off
- self.schedule_message(156, self.refresh_state) #refresh the controller to turn clip lights back on
- def lights_on(self):
- for col_num in range (8): #load random colour numbers into the buffer row (row 0)
- colour = Live.Application.get_random_int(0, 10) #0=off, 1=green, 2=green blink, 3=red, 4=red blink, 5=yellow, 6=yellow blink, 7-127=green
- if colour % 2 == 0 or colour > 6: #filter out the blinking lights (even numbers) and skew towards having more "off" lights
- colour = 0
- list_of_rows[0][col_num] = colour #load the buffer row
- self.load_leds()
- def lights_off(self):
- for col_num in range (8): #step through 8 columns/tracks/channels
- list_of_rows[0][col_num] = 0 #set to zero (lights off)
- self.load_leds()
- def load_leds(self):
- for row_num in range (6, 0, -1): #the zero row is a buffer, which gets loaded with a random sequence of colours
- note = 52 + row_num #set MIDI notes to send to APC, starting at 53, which is the first scene_launch button
- if row_num == 6: #the clip_stop row is out of sequence with the grid
- note = 52 #note number for clip_stop row
- for col_num in range (8): #8 columns/tracks/channels
- list_of_rows[row_num][col_num] = list_of_rows[row_num-1][col_num] #load each slot from the preceding row
- status_byte = col_num #set channel part of status_byte
- status_byte += 144 #add note_on to channel number
- self._send_midi((status_byte, note, list_of_rows[row_num][col_num])) #for APC LEDs, send (status_byte, note, colour)
- list_of_rows = [[0]*8 for index in range(7)] #create an 8 x 7 array of zeros; 8 tracks x (1 buffer row + 5 scene rows + 1 clip stop row)
将这两个脚本保存至脚本文件夹,我们可以在MIDI preferences下拉菜单中选择新的控制器脚本。这会强制Live去编译和运行新的脚本。如果红框没有出现的话,我们可以知道有哪里出错了,然后检查Live的日志文件看看出了什么错误并找出问题所在。我们可以设置灯光演示在初始化的时候运行,那样它就可以马上执行,但我们真正想要说明的是我们的函数能够在Max for Live中调用。
为了这个目的,我们创建一个使用M4L.api.SelectControlSurface的Max patch,来得到我们的新函数的路径,这样我们就可以bang一声就可以调用函数。我们发送一个调用light_loop的信息给控制脚本,并反过来调用lightshow_on来点亮LED,lightshow_off来关闭LED——然后重置control surface,这样LED可以重新显示session的状态。

好的,尽管这是一个简单的流程图,让我们尝试做一些更有用的东西——我们将Metronome button重新赋值作为Device Lock button。我们利用APC40plus1脚本,和重写一些方法来达成这个目的(并且不需要用到Max for Live)。
Device Lock - why isn't this feature standard? —— 锁定设备,这为什么不是标准功能?
框架中的TransportComponent类包含了两个吸引我们的方法:set_metronome_button和set_device_lock_button。这是继承自APC40的类,并可用于改变按键赋值。为了改变其中一个按键为另一个,我们需要重写APC40脚本中正常赋值的方法。这段代码在_setup_device_and_transport_control代码段中。在我们重写方法之前,我们要做一些基本的设置。
首先,我们要实例化一个APC40 ControlSurface对象,然后使用APC40的__init__方法进行初始化,最后我们进行重写_setup_device_and_transport_control方法,即是我们将物理的metronome button充当device lock button:
- # http://remotescripts.blogspot.com
- from APC40.APC40 import *
- class APC40plus1(APC40):
- __module__ = __name__
- __doc__ = ' Main class derived from APC40 '
- def __init__(self, c_instance):
- APC40.__init__(self, c_instance)
- self.show_message("APC40plus1 script loaded")
- def _setup_device_and_transport_control(self): #overriden so that we can to reassign the metronome button to device lock
- is_momentary = True
- device_bank_buttons = []
- device_param_controls = []
- bank_button_labels = ('Clip_Track_Button', 'Device_On_Off_Button', 'Previous_Device_Button', 'Next_Device_Button','Detail_View_Button', 'Rec_Quantization_Button', 'Midi_Overdub_Button', 'Device_Lock_Button')
- for index in range(8):
- device_bank_buttons.append(ButtonElement(is_momentary, MIDI_NOTE_TYPE, 0, 58 + index))
- device_bank_buttons[-1].name = bank_button_labels[index]
- ring_mode_button = ButtonElement(not is_momentary, MIDI_CC_TYPE, 0, 24 + index)
- ringed_encoder = RingedEncoderElement(MIDI_CC_TYPE, 0, 16 + index, Live.MidiMap.MapMode.absolute)
- ringed_encoder.set_ring_mode_button(ring_mode_button)
- ringed_encoder.name = 'Device_Control_' + str(index)
- ring_mode_button.name = ringed_encoder.name + '_Ring_Mode_Button'
- device_param_controls.append(ringed_encoder)
- device = ShiftableDeviceComponent()
- device.name = 'Device_Component'
- device.set_bank_buttons(tuple(device_bank_buttons))
- device.set_shift_button(self._shift_button)
- device.set_parameter_controls(tuple(device_param_controls))
- device.set_on_off_button(device_bank_buttons[1])
- device.set_lock_button(device_bank_buttons[7]) #assign device lock to bank_button 8 (in place of metronome)...
- self.set_device_component(device)
- detail_view_toggler = DetailViewControllerComponent()
- detail_view_toggler.name = 'Detail_View_Control'
- detail_view_toggler.set_shift_button(self._shift_button)
- detail_view_toggler.set_device_clip_toggle_button(device_bank_buttons[0])
- detail_view_toggler.set_detail_toggle_button(device_bank_buttons[4])
- detail_view_toggler.set_device_nav_buttons(device_bank_buttons[2], device_bank_buttons[3])
- transport = ShiftableTransportComponent()
- transport.name = 'Transport'
- play_button = ButtonElement(is_momentary, MIDI_NOTE_TYPE, 0, 91)
- stop_button = ButtonElement(is_momentary, MIDI_NOTE_TYPE, 0, 92)
- record_button = ButtonElement(is_momentary, MIDI_NOTE_TYPE, 0, 93)
- nudge_up_button = ButtonElement(is_momentary, MIDI_NOTE_TYPE, 0, 100)
- nudge_down_button = ButtonElement(is_momentary, MIDI_NOTE_TYPE, 0, 101)
- tap_tempo_button = ButtonElement(is_momentary, MIDI_NOTE_TYPE, 0, 99)
- play_button.name = 'Play_Button'
- stop_button.name = 'Stop_Button'
- record_button.name = 'Record_Button'
- nudge_up_button.name = 'Nudge_Up_Button'
- nudge_down_button.name = 'Nudge_Down_Button'
- tap_tempo_button.name = 'Tap_Tempo_Button'
- transport.set_shift_button(self._shift_button)
- transport.set_play_button(play_button)
- transport.set_stop_button(stop_button)
- transport.set_record_button(record_button)
- transport.set_nudge_buttons(nudge_up_button, nudge_down_button)
- transport.set_tap_tempo_button(tap_tempo_button)
- transport.set_quant_toggle_button(device_bank_buttons[5])
- transport.set_overdub_button(device_bank_buttons[6])
- #transport.set_metronome_button(device_bank_buttons[7]) #using this button for lock to device instead...
- bank_button_translator = ShiftableTranslatorComponent()
- bank_button_translator.set_controls_to_translate(tuple(device_bank_buttons))
- bank_button_translator.set_shift_button(self._shift_button)
现在,保存我们新的APC40plus1脚本至脚本目录,打开live,然后在MIDI Control Surfaces下拉菜单中选择APC40plus1。
在这里,Metronome button现在是Device Lock按键了。现在,我们在不修改原始的APC40脚本的情况作了一些功能性的修改,我们仍要以来其他的原始脚本,因为我们从那里继承方法。这意味着我们需要关注Live版本更新时脚本的改变,因为新的更新会可能破坏我们的新脚本。那么我们何不通过检查一下与8.1.3 Rc-1版本的兼容性来开始?
Live 8.1.3 - subtle changes ——微妙的变化
Live8.1.3准备进入放出阶段,我们可以透过beta版来一看接近正式版的MIDI脚本。事实证明,并没有太多的变化。框架类基本上是一样的,并且添加了几个新的支持设备——最显著的是APC20和Serato控制器。我们将Serato脚本作为以后研究的对象(顺便一说它的脚本看起来也很不错),然后来研究一下APC20的脚本。
APC20 - the APC40’s little brother
APC20基本就是APC40减去交叉推子,旋钮,和右边按键的阉割版本。在更少的按钮布局下它为了保留基本的功能,左边的一些按键变成了两用的,正如APC20的快速指南中所说明的。例如,APC40的Stop All Clips按钮现在变成了APC20上的Shift按钮。通过按住这个按钮并选择Record按钮,APC20的滑块可以赋值为Volumn,Pan,Send A,Send B,Send C,User 1,User 2和User 3。
另一个APC20的新功能,则没有分享给APC40,就是Note Mode。APC20可以利用Note Mode按钮切入Note Mode(就是APC40上的Master Select按钮)。这可以使8*5网格按钮用于发送MIDI信号——例如用来控制drum rack。那么,APC40上有Note Mode吗?
Sysex是用于设定APC的工作模式,同时APC40有3个文档中有记录的工作模式,而APC20有4个。如APC40通信协议文档中所展示的,一个“Type 0”系统专用消息是用于设置APC40的工作模式。第八个字节是模式标识符:
0x40 (decimal 64) Generic Mode
0x41 (decimal 65) Ableton Live Mode
0x42 (decimal 66) Alternate Ableton Live Mode
在8.1.3的脚本中显示了为了APC20新添加了一个模式的字节值:
0x43 (decimal 67) APC20 Note Mode
遗憾地,这个新的模式值(0x43)对于APC40是无用的——硬件对于这个值不会产生响应。这个不是脚本本身的限制,而是需要更新固件才能使APC40拥有note mode。到目前为止,没有一个是可用的。另一方面,我们能够编写一个脚本通过转换MIDI音符和通道信号来仿真Note Mode(目前已经有一个框架方法来进行通道转换,这是一个不错的着手点)。如果Akai决定不提供APC40的固件更新,这是一个未来的脚本项目。
进一步对8.1.3脚本的调查显示APC40的脚步结构有了小小的改变,为了适应APC20。现在APC20和APC40类都是作为APC父类的子类而存在。APC类现在处理握手过程,和其他适用于两个的方法。还有一个新的APCSessionComponent模块,用于连接多个APC设备(这个模块用于处理红框便宜,这样多个APC设备的session框可以并排排列)。下面是这个类的文档解释:
- class APCSessionComponent(SessionComponent):
- " Special SessionComponent for the APC controllers' combination mode "
相反的,8.1.1和8.1.3版本只有这些小小的改变。实际上,我们的APC40plus1脚本在8.1.3能够正常地运行,即使这是基于8.1.1版本的代码。这是一个好消息。
现在,just for fun,我们尝试用APC40来仿真APC20,通过重写sysex字节中的Product ID和Mode。APC20的product_model_id为123——而APC40是115(或这十六进制的0x73,如APC40通信协议文档中所列出的)。因此,我们需要如下来修改APC20的脚本:
- def _product_model_id_byte(self):
- return 115 #was originally 123
然后在,在APC20的consts.py文件中,我们需要将Note Mode的值由67改为65
- MANUFACTURER_ID = 71
- ABLETON_MODE = 65
- NOTE_MODE = 65 #Was : 67 (=APC20 Note Mode); 65 = APC Ableton Mode 1
好的,这个仿真确实能够运作,毕竟,APC40在APC20模式中只有一半可用——右边是完全无响应的——而且Note Mode(现时)什么都没有。另一方面,使用shift + record按钮来重新赋值slider是一个不错的功能。这是确实可以通过APC20和APC40的脚本来编写一个混合脚本,如果有人觉得有这样的倾向。
Conclusion
MIDI remote scripts,特别是Framework classes,提供了一个方便和相对直接的机制来定制控制接口的操作——无论使不使用Max for Live。Live8的脚本照顾到了Max for Live,但也保留一直以来了最基本的功能。APC40的脚本就是一个好例子,还有新的APC20的脚本——都提供了一个很好的平台来进行定制。
好的,享受编写脚本——记得分享你的发现和脚本给Live社区!
Hanz Petrov
April 13,2010